Shin Splints vs. Stress Fractures: A Step-by-Step Return-to-Run Plan
 May, 13 2026
There is nothing worse than lacing up your shoes, feeling that familiar burn in your shins, and realizing it’s not just fatigue-it’s pain. For runners, the line between a manageable annoyance and a season-ending injury is thin. You might be dealing with medial tibial stress syndrome, commonly known as shin splints, or something more serious like a tibial stress fracture. The difference matters because rushing back too soon can turn a minor setback into months of forced rest.
The goal here isn’t just to get you back on the pavement; it’s to ensure you stay there. Evidence shows that structured, phased return-to-run protocols reduce recurrence rates significantly compared to self-managed approaches. This guide breaks down exactly how to distinguish these injuries, manage the pain, and progress safely back to your pre-injury mileage without blowing out your bone again.
Shin Splints vs. Stress Fractures: Knowing the Difference
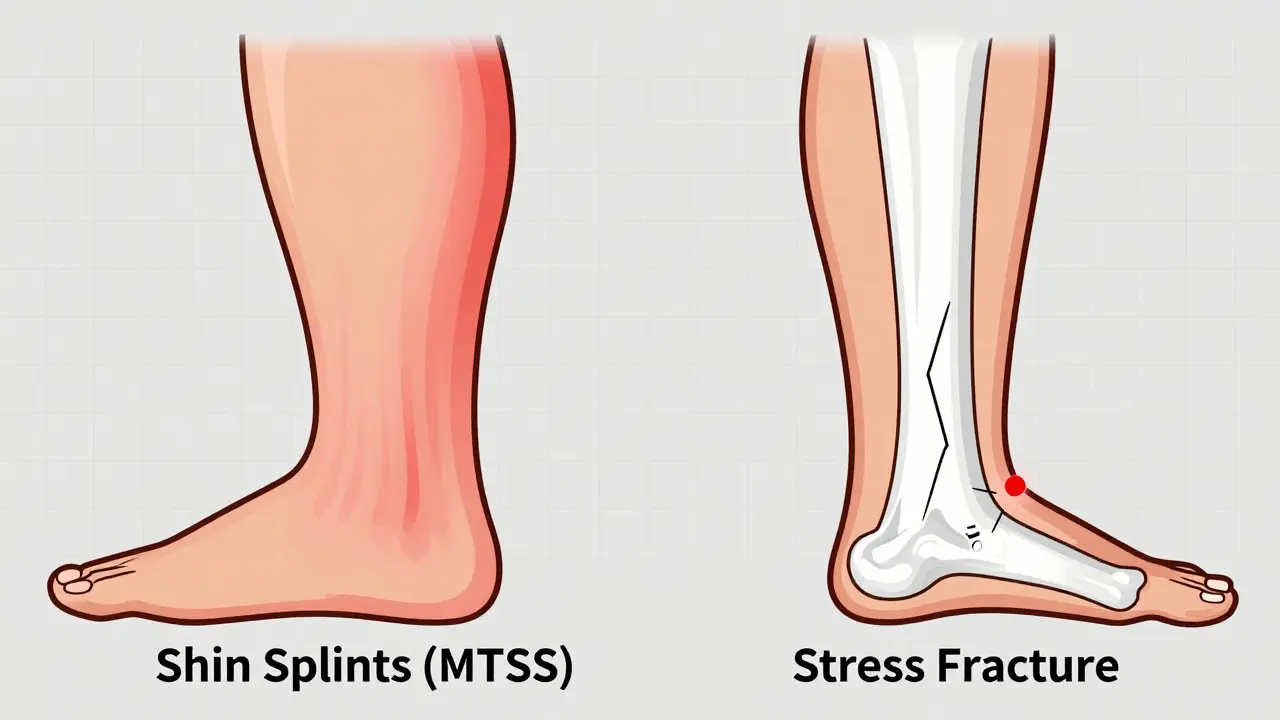
You cannot treat what you do not understand. While both conditions cause lower leg pain, their origins and healing timelines are vastly different. Shin splints, or MTSS, involve inflammation of the muscles, tendons, and bone tissue around the tibia. It is an overuse injury often triggered by sudden increases in training load. Stress fractures, however, are tiny cracks in the bone itself. They result from repetitive force that overwhelms the bone’s ability to repair itself.
A key distinction lies in the pain pattern. With shin splints, you typically feel a diffuse ache along the inner edge of the shinbone. It might hurt when you start running but often warms up. With a stress fracture, the pain is usually pinpoint-you can press one specific spot and feel sharp pain. Furthermore, stress fracture pain often persists even when you are resting or walking, whereas shin splint pain frequently subsides after activity.
| Feature | Shin Splints (MTSS) | Stress Fracture |
|---|---|---|
| Pain Location | Diffuse, along the inner shin | Pinpoint, specific spot on bone |
| Pain During Activity | Hurts at start, may warm up | Worsens with continued impact |
| Pain at Rest | Usually minimal or none | Often present, especially at night |
| Healing Time | 3-6 weeks | 6-12+ weeks |
| Risk Factor | Sudden mileage increase | Bone density issues, RED-S |
If you suspect a stress fracture, stop running immediately. Continuing to load a cracked bone can lead to a complete fracture, requiring surgery. Get an MRI or bone scan for confirmation. If it is shin splints, you can begin a modified loading protocol sooner.
The Foundation: Cross-Training and Pain Management
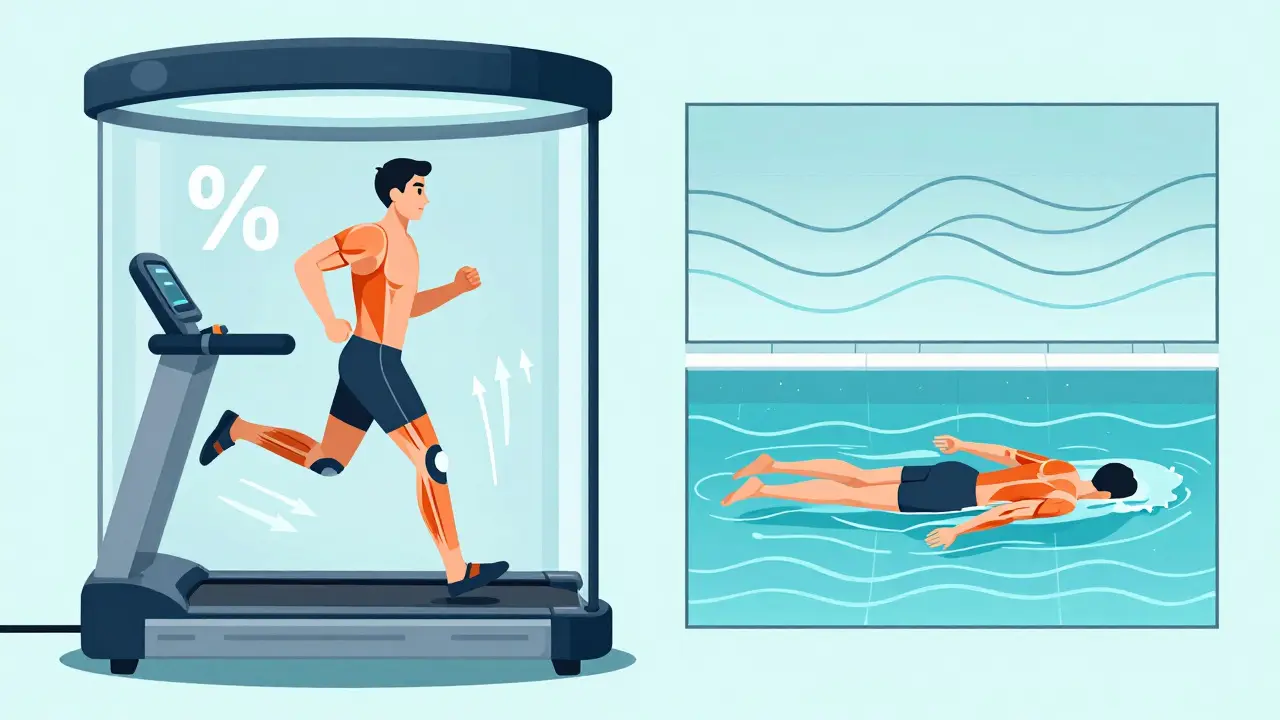
Before you take another step in running shoes, you need to maintain your cardiovascular fitness without impacting your legs. This phase is critical for both mental and physical health. Many runners panic when they hear "rest," interpreting it as total inactivity. Instead, view this as active recovery. Low-impact activities like swimming, cycling, or using an anti-gravity treadmill allow you to keep your heart rate up while keeping stress off the tibia.
Anti-gravity treadmills, such as the AlterG, have become a game-changer in rehabilitation. By reducing body weight by 40-60%, they allow runners to practice their gait mechanics with minimal bone strain. Studies show this can reduce recovery time by nearly a month compared to traditional rest. If you don’t have access to this technology, pool running is an excellent alternative. The water provides resistance similar to running while eliminating impact forces entirely.
Pain monitoring is your compass during this phase. Use a simple 0-10 scale. A pain level of 2 or below during cross-training is acceptable. If you hit a 3 or higher, or if the pain lingers into the next day, you have done too much. The rule is simple: pain should never increase during or after activity. If it does, dial back the intensity or switch to a non-weight-bearing modality like upper-body ergometry.
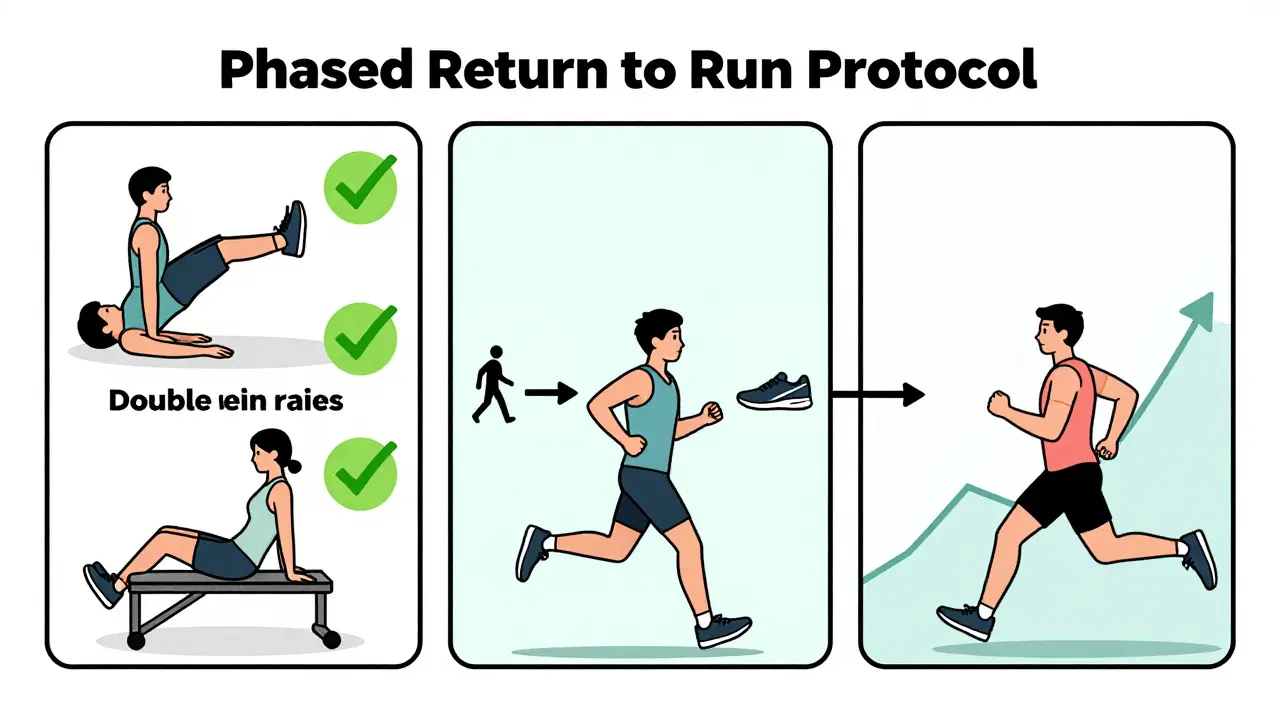
Phase 1: Building Bone and Muscle Strength
Running requires strong bones and supportive muscles. Before reintroducing impact, you must strengthen the structures that absorb shock. This phase focuses on double-leg exercises to build baseline strength without excessive load. Start with double-leg heel raises. Perform three sets of 15-20 repetitions daily. Focus on slow, controlled movements rather than speed.
Glute strengthening is equally important. Weak hips force the knees to collapse inward, increasing strain on the shins. Incorporate clamshells, side-lying leg lifts, and glute bridges into your routine. Research indicates that 57% of runners who skip hip strengthening experience recurrence within three months. Do not skip these exercises. They are the foundation of your return.
Progression criteria for this phase are strict. You must be able to walk pain-free for seven consecutive days before moving to the next stage. This does not mean "mostly pain-free." It means zero pain during normal daily activities. If you still limp or favor one leg, stay in this phase longer. Rushing this step is the most common reason for failed recoveries.
Phase 2: Introducing Impact Through Run-Walk Intervals
Once you pass the walking test, you can introduce running. But you do not just go out and run. You use a run-walk method. This approach allows you to accumulate running volume while limiting continuous impact time. Start with a 1:4 ratio-one minute of running followed by four minutes of walking. Repeat this cycle for a total of 20 minutes.
This ratio feels frustrating at first. You want to run continuously. However, the short bursts prevent the cumulative micro-damage that aggravates healing tissue. Monitor your pain closely. If you feel no pain during the session and no increase in pain the next morning, you can progress. Move to a 1:3 ratio for 25 minutes the following week. Then 1:2 for 30 minutes, then 1:1 for 35 minutes.
By week six, you should aim for a 3:1 ratio-three minutes running, one minute walking-for 40 minutes total. This gradual progression respects the bone’s remodeling cycle, which takes 90-120 days to fully stabilize. Skipping steps or jumping ratios based on how you "feel" on a good day is a recipe for disaster. Stick to the schedule.
Phase 3: Increasing Volume and Complexity
After completing the run-walk intervals, you transition to continuous running. Start with short, easy runs. Keep your pace slow-slower than your usual conversational pace. The goal is volume, not speed. Begin with 10-15 minute runs every other day. Always have a rest day between running sessions. This allows the bone to recover from the previous impact load.
Increase your weekly mileage by no more than 10%. Even this standard rule is considered aggressive by some experts for returning athletes. Consider a "two weeks forward, one week back" approach. Increase mileage for two weeks, then drop it by 20% in the third week. This built-in recovery week helps consolidate gains and reduces overload risk.
Incorporate plyometrics cautiously. Start with double-leg hops, progressing to single-leg hops only after you can perform them pain-free. Explosive strength is crucial for running economy and injury prevention. However, high-impact plyometrics place significant stress on the tibia. Only add these once you have completed several weeks of continuous running without incident.
Nutrition and Hormonal Health: The Hidden Factors
Your bones heal better when your body has the resources to do so. Energy availability plays a massive role in bone health. Relative Energy Deficiency in Sport (RED-S) occurs when dietary intake is insufficient to cover exercise expenditure. This hormonal imbalance suppresses bone formation and increases fracture risk. Up to 31% of female athletes with recurrent stress fractures have undiagnosed RED-S.
Ensure you are eating enough calories to support your training. Prioritize calcium and vitamin D intake. Dairy products, leafy greens, and fortified foods are good sources. Vitamin D helps your body absorb calcium, so consider supplementation if you live in a low-sunlight area or spend most of your time indoors. Blood tests can check your levels, but consistent dietary habits are the long-term solution.
Hormonal health also impacts bone density. In women, irregular menstrual cycles are a red flag for low energy availability. If you have missed periods, consult a healthcare provider before continuing your return-to-run plan. Addressing these underlying issues is not optional; it is essential for preventing future injuries.
When to Seek Professional Help
Self-management works for many mild cases, but professional guidance accelerates recovery and reduces risk. Physical therapists specializing in running can analyze your gait, identify biomechanical flaws, and customize your strengthening program. They can also provide manual therapy to address muscle tightness that contributes to shin pain.
If you experience any of the following, see a doctor immediately:
- Swelling or bruising on the shin
- Inability to bear weight on the affected leg
- Pain that wakes you up at night
- No improvement after two weeks of rest and modification
Advanced diagnostics like MRI or DEXA scans can rule out stress fractures and assess bone mineral density. Early intervention prevents minor issues from becoming major setbacks. Don’t pride yourself on toughing it out. Smart recovery is faster than prolonged injury.
How long does it take to recover from shin splints?
Recovery from shin splints typically takes 3 to 6 weeks with proper management. This includes initial rest, cross-training, and a gradual return-to-run protocol. Faster recovery depends on adhering to pain guidelines and addressing underlying causes like weak hips or poor footwear.
Can I run through shin splint pain?
You should not run through sharp or worsening pain. Mild discomfort (1-2/10) may be acceptable during early return-to-run phases, but pain that increases during or after activity is a sign to stop. Running through significant pain risks turning shin splints into a stress fracture.
What is the best cross-training for stress fractures?
Low-impact activities like swimming, cycling, and pool running are ideal. Anti-gravity treadmills are highly effective as they allow running motion with reduced weight bearing. Avoid high-impact cross-training like elliptical machines if they cause pain.
How do I know if it's a stress fracture or shin splints?
Shin splints cause diffuse pain along the inner shin that often warms up. Stress fractures cause pinpoint pain at a specific spot that worsens with activity and may persist at rest. An MRI or bone scan is required for definitive diagnosis.
Should I wear orthotics for shin splints?
Orthotics may help if you have flat feet or overpronation. However, strengthening your hips and ankles is more effective long-term. Heel lifts offer only temporary relief. Consult a physical therapist to determine if custom orthotics are necessary for your biomechanics.